Contents
Language Program Classing
EDMISS Classing enables you to allocate students to classes depending on their level of English. There can be multiple classes run concurrently for different days and times, in different rooms and with different teachers. Class allocation can change through the period of the program. Attendance is calculated and assessments can be stored for the period of the program whenever tests are undertaken.
Features
- View student class allocation and history
- View student age, gender, country of origin and nationality and class mix
- Generate class lists for attendance marking
- Store student results (grades)
- Enter student absences and automatically calculate attendance
- Student and Teachers can view updates and changes immediately in the student and teacher portal
Benefits
- View and manage class mix: age, gender, nationality for optimum allocation
- View and manage Class numbers for best utilisation of resources including teachers and rooms
- Classes can be moved and pre-allocated in the future without effecting current allocation
Language Class allocation is one of the strengths of Edmiss, with the complex movement and mixture of classes depending on what is taught to constantly move students throughout their course and progress the students through different levels as they progress at different speeds.
Language students do not study a program that is measured by a pass or fail. Studying a Language program, students are measured and tested, and generally assigned a Language level, and reviewed constantly as they progress to allocate them to the appropriate class or program .
Students are then placed into an appropriate class, with other similar level students. Students studying Language Programs do not necessarily progress at the same rate. Each student is typically regularly tested and can move up levels and may change classes depending on their progress.
In Edmiss a Language program can be studied for a varying period, the class/es the students are assigned can be changed at any time in the period of the enrolment/program. The history and future class assignments can be seen when allocating students to classes.
The purpose of this section of the manual is to assist you in the allocation of students to classes. You will also be able to print class rolls (now not needed with the student and teachers online portal), store student tests, results and grades; enter student absences and calculate attendance.
Setup – Faculties, Course/Programs, Sessions and Levels
Faculties
A faculty in EDMISS refers to a group of programs/courses. You can specify week long holiday/vacation or term breaks for the group of programs. The faculty is also used in most reports as a grouping report option. *Note* A holiday break must be in week blocks from Monday to Friday inclusive. Do not specify any period shorter than 1 week as a faculty holiday.
To do this, go to EDMISS Main – Utilities – Faculties.

For Faculty Details, go to EDMISS Main – Utilities – faculties and select the faculty.

Navigate to the holidays tab to specify the week holidays for that faculty. Note: Only week holidays should be entered – starting on a Monday and ending on a Friday.

Programs/Courses
Each program/course is created and then identified as belonging to a particular faculty. This means that when the student offer or enrolment is added and the start date is specified, the length of the course takes into consideration the relevant faculty holidays to calculate the program/course end date. To see the programs/courses belonging to a faculty, go to EDMISS Main – Utilities – Programs.

Program Details
A part of the details includes the specification of how many hours each week the student studying this program attends in hours. The total hours are used to calculate the attendance when the absence is entered for the student studying the program.

Sessions
For each language program you can specify how many classes a student must attend by specifying sessions. Sessions can be used to identify a class the student must attend. For each sessions marked, a class must be attended by the student. You can also use sessions to identify when a student attends a class e.g. you may designate 4 sessions as AM, PM, Evening and Private. For each individual program identify the sessions that the student must attend a class. For example Part-time Program may have the student only attending an AM session, or only a PM session. A full time program may have both AM and PM sessions enabled. An evening program may have both PM and Evening sessions enabled for full time Evening program. A part-time Evening Program may only have the Evening session enabled. You also have the option to use sessions to indicate what type of class will be created and the student will attend. for example Reading, Writing, Speaking and Listening. This enables students to be allocated to different classes depending on their different skill levels.
By selecting the sessions for the program, when a student is enrolled to study that program, the student must attend a class for each of the selected sessions.
Session are setup by the College. To do this, go to EDMISS Main – Utilities – Setup Configuration – Language – Sessions. You can display and use either 4 or 8 sessions. A session can be used to reflect a time period during the day and what is studied during that time. In the setup demonstrated below, we have 4 sessions: AM, PM, Options and Private. A part time course may only have the AM session selected, whereas a full time course could have the AM and PM sessions selected.

An alternate way to setup sessions is to use the sessions as an indication of what is taught in the class. For example the sessions could be named Pronunciation, Vocabulary, Reading, Writing, Grammar and Listening & Speaking.
Language Levels
Classes and Students are assigned Language Levels. This enables you to filter and display the students of the appropriate level for the Class. As the student progresses, so should the student assigned English Level changes as they progress. This enables staff to use Levels to find the students at the appropriate level and allocate those students to the appropriate Class by class level. English levels are setup by the College and can be listed as Beginner, Beginner-Intermediate, Intermediate, Intermediate-Advanced and Advanced. Alternatively, you can use a numbering system shown below. To tailor these levels for your College, go to EDMISS Main – Utilities – Setup Configuration – Language – Levels.

Language Class Allocation
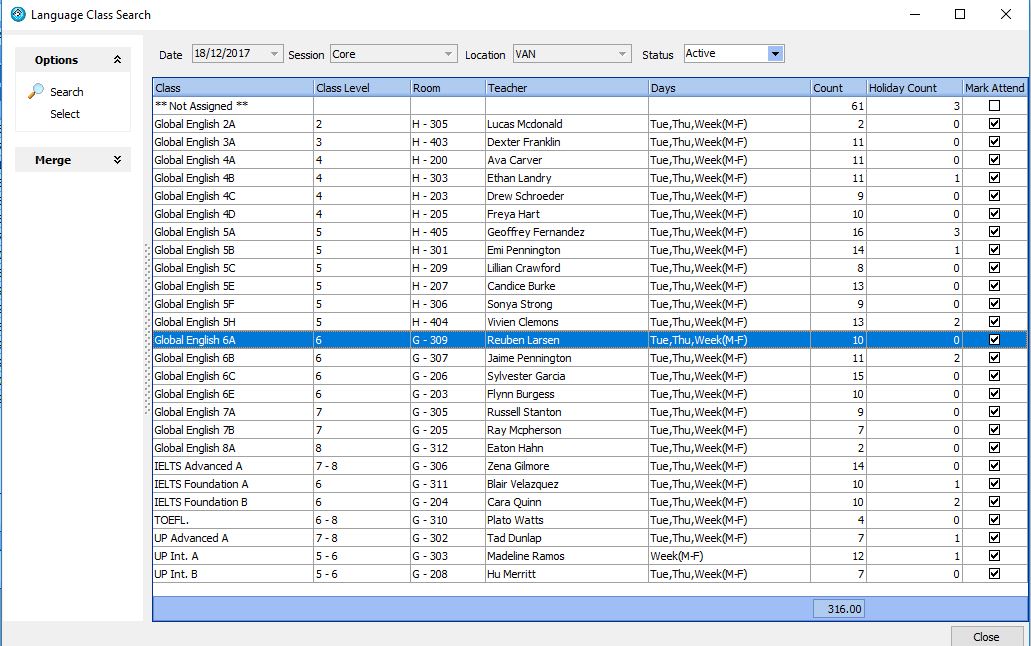
To view the allocation of current students to Language Classes for a session, go to EDMISS Main – Classes – Language Classes. For each class, you specify class name (the class name should not include the teachers name or references the class level as they are already listed as separate fields), the class level, the room, and teacher. You can also see the total number of students allocated to each class and absentees for that week.
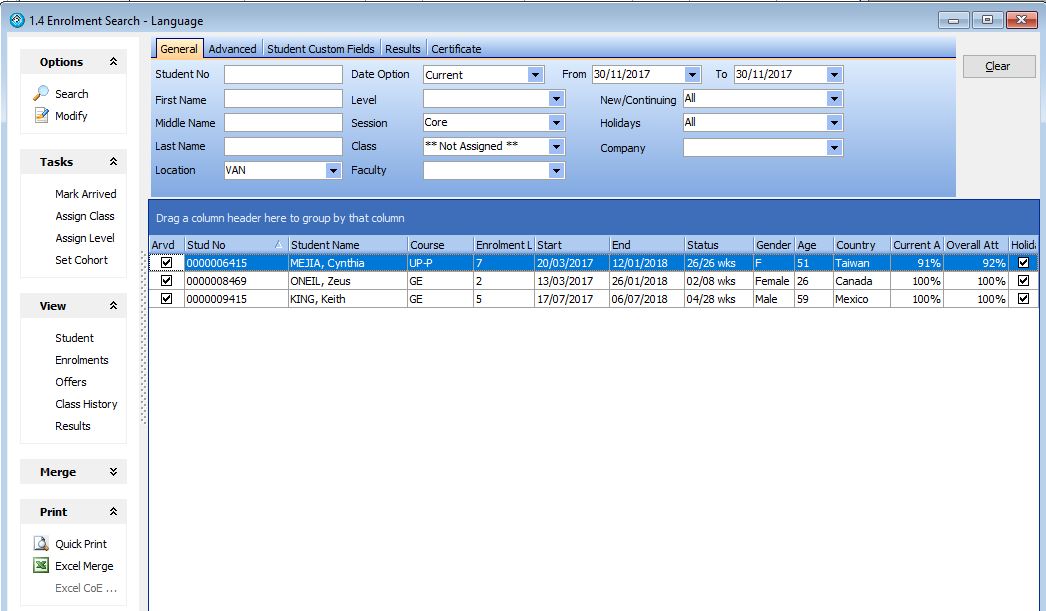
We also provide a line listed as **Not Assigned** which displays students that have not yet been allocated to a class for that session, but need to attend a class for that session (this is specified by the student studying a program/course which has the session marked).

From the above screen you can display the students in a class by selecting the class (such as TOEFL) and selecting the option Class – Allocation. This will display the students that are allocated to that class.

Class assignment – Allocating ** Not Assigned ** Students to a class
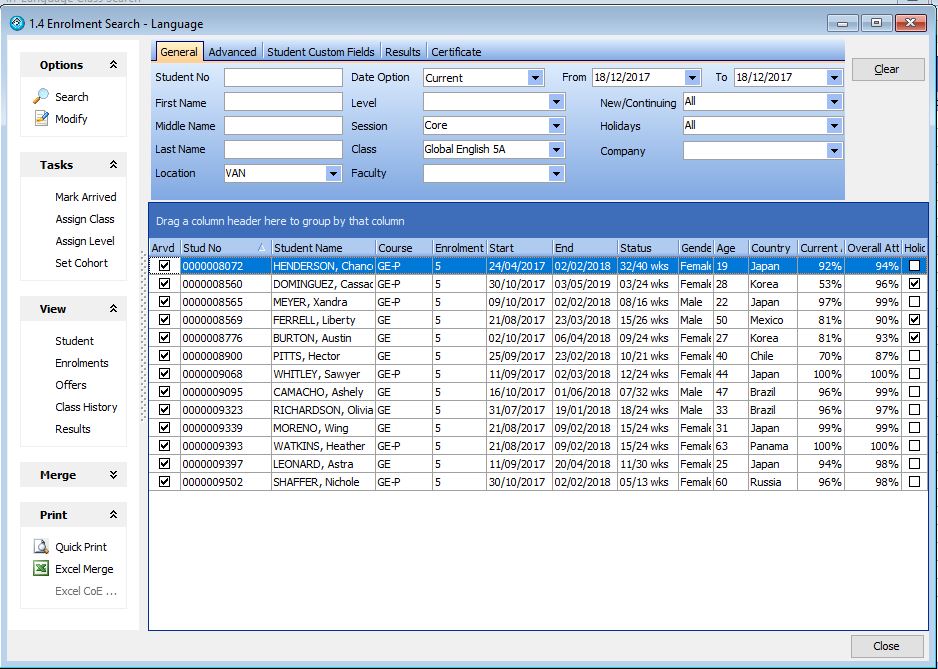
To allocate the ** Not Assigned ** students to a class, select the line ** Not Assigned ** and press the option Class – Allocation. You will see the details of students who are waiting to be placed in a class.

When you are ready to assign the student to a class, highlight the student/s and select Tasks – Assign Class.

Now highlight the class you want to place the student in and press Select.

If you press Search again on Screen 1.4 this will update the list and you will see that the student(s) has been removed from the **Not Assigned ** list.
You can also go back to Screen 4.7, which displays the Classes. You will see the assigned number for the class has been updated. You can also highlight the class and display the students allocated to that class which will include any recently placed students.

Class assignment – moving students from one class to another class
If students have already been allocated to a class for the current week and you want to change the class the student attends, go to the class the student is in, then assign them to a new class.
You can highlight and select multiple students from one class to be assigned to a new class. Multi-select works the same way in all Microsoft Windows products do, hold down the alt key and then click on multiple students. I have selected 5 students to transfer below as an example.

Now by pressing assign class you can transfer all 5 students at once.
Highlight and select the class and those students will be placed in the new class.

Each time a student is placed in a new class for a session, the class history is automatically updated.
Class Assignment – Assigning Students to a future class
Edmiss supports the option to pre-assign a class in the future, without effecting current class allocation. Typically this would be used to plan the expected progress of students and “levelling up”
For example, if you want 2 students currently in the Intermediate 5A class to be pre-allocated to the Upper-Intermediate 6A class in 2 weeks.
Go to the Language Class Search, and change the search date to 2 weeks time
Display the class allocation for the class you want to move the students from e.g. Intermediate 5A, and select the students:

Now select the Class (displayed for the 2 week future date), you want the students to be placed/assigned to and press select:
Refreshing the Class allocation by pressing search shows the student have been moved out of the class:
If you search the classes for the current date you will see the students are still allocated to the Intermediate 5A Class:

Looking at the Student’s Class History you can also see the class history and pre-allocation:

Student Enrollment – Assigning classes by enrollment
The class a student is currently assigned and pre-allocated can be made by enrollment from the Class tab. Go to the Student Enrollment – Class tab to display the current, history and pre-allocations. IF you want to change a class highlight the class and press modify. You can choose the class to shift the student to, and when the change is to take effect:

For example the above student is allocated to Class 6A on Jan 1, 2018, for the Core session, I will change the Class t 6B by selecting the class from the drop down and pressing ok. After pressing ok, the class allocation for the student enrollment looks like the screen below, and the class lists are updated.

Language Attendance
The building blocks for attendance need to be setup in EDMISS. The calculation is based on the program the student is studying. The enrolment lists the program and the program specifies the hours per week the student needs to be in attendance. To specify this, please go to EDMISS Main – Utilities – Program.

The number of hours attendance for a student is calculated using the number of attendance hours per week and the number of weeks in the student’s enrolment. In the above example, a student studying Intensive General English has a total of 21 hours of attendance per week. In this example, if the student is studying a course for 10 weeks, then to receive 100% attendance the student needs to be in attendance for 10 x 21 hours = 210 hours.
Absences are entered in EDMISS and are used in the calculations for attendance. We encourage Colleges to mark attendance on the Teacher Portal.
Alternatively staff can enter the student’s absences by class into EDMISS. To do this, please go to EDMISS Main – Classes – Language Classes. Select the week (starting day as Monday), select the Session and Location and press search. The classes will be displayed.
Highlight the Class and press the Class – Absence button on the left panel from this screen.

This will display the Language Class Absence Entry form, where absent hours can be entered and displayed for the students in that class for that week.
Note the times are generated from the Class days and times specified here:

After the student absences have been entered, press OK to post the hours of absence to the student enrollment and update the students attendance calculation. You can check what has been entered by going into the student enrollment details.

This shows that the hours of absence have been updated into the student enrollment details. Alternatively, absences can be entered enrolment by enrolment. This is certainly more of a tedious method but can be an option if the absence needs to be annotated or flagged.

Regardless of whether the absence is entered through the student enrollment or in bulk by class, attendance will always be recalculated and updated.
EDMISS calculates attendance two ways. The standard calculation is called overall attendance. The other attendance calculation is called current attendance. The current attendance should be used to provide an indication of what the overall attendances would be if the current level of attendance continues throughout the student’s course.
As an example of current and overall attendance percentage calculation – If a student is doing a 10 week course and was absent during the second week, then as of the end of week 2, the current attendance is 50% and the overall attendance is 90%.
Language Rolls
Students should get into the habit of viewing their Class Timetables and Attendance via the Student Portal.
Teachers should enter Absence and Results via the Teacher Portal.
Alternatively, once Students are allocated to a class, the Roll can be printed to mark attendance. We have several reports and well as the option to create your own report from Ms Excel.
EDMISS Reports – Classes – Language – Class Roll (Attendance) The report options are:
These option in preview display:
This report is designed to be annotated by the teacher in the classroom and collected at the end of the week. Following this, absences should be entered into EDMISS to update the attendance calculations.
An alternate report to use is EDMISS Reports – Classes – Language – Class Register. The report provides space at the bottom to leave more detailed teacher notes.
So that students know what classes to attend for the different sessions, we have provided a Noticeboard Roll. To access this, please go to EDMISS Reports – Classes – language – Student Class List (Noticeboard). This report can also be exported to Ms Excel so you can edit and tailor the layout.