Contents
Using Offers to follow up and confirm enrolments
The admissions process has two parts Offers and Enrolments (soon to be 3 parts with online applications).
Offers allow you to enter details about programs and services requested by agents for students and students directly.
- An offer is completely flexible and does not impact Financials or Classing.
- An offer includes one or more line items with fees relating to one or multiple course/programs, airport transfers, accommodation arrangement requests, course materials and application fees.
- Offer line items can be changed or deleted.
As soon as an offer is accepted, it generates an enrolment = an accepted offer. All details are automatically transferred from the offer to the enrolment. Once an offer is accepted and becomes an enrolment, the original offer cannot be changed.
The enrolment generation enables classing and financials, i.e. allows the student to be placed into classes with invoiced fees appearing in Financials.
Offers can be searched and displayed by:
- Offers date period
- Program/Course start date period
- Accommodation placement commencement date period
- Airport transfer request date period
Searching Offers by date period (especially course start date, airport transfer request and accommodation date period) is a very powerful tool to be used by the Sales team. It is recommended to constantly review the offers by offer date e.g. prior period, approaching course start date, and approaching airport transfer request and accommodation request start date.
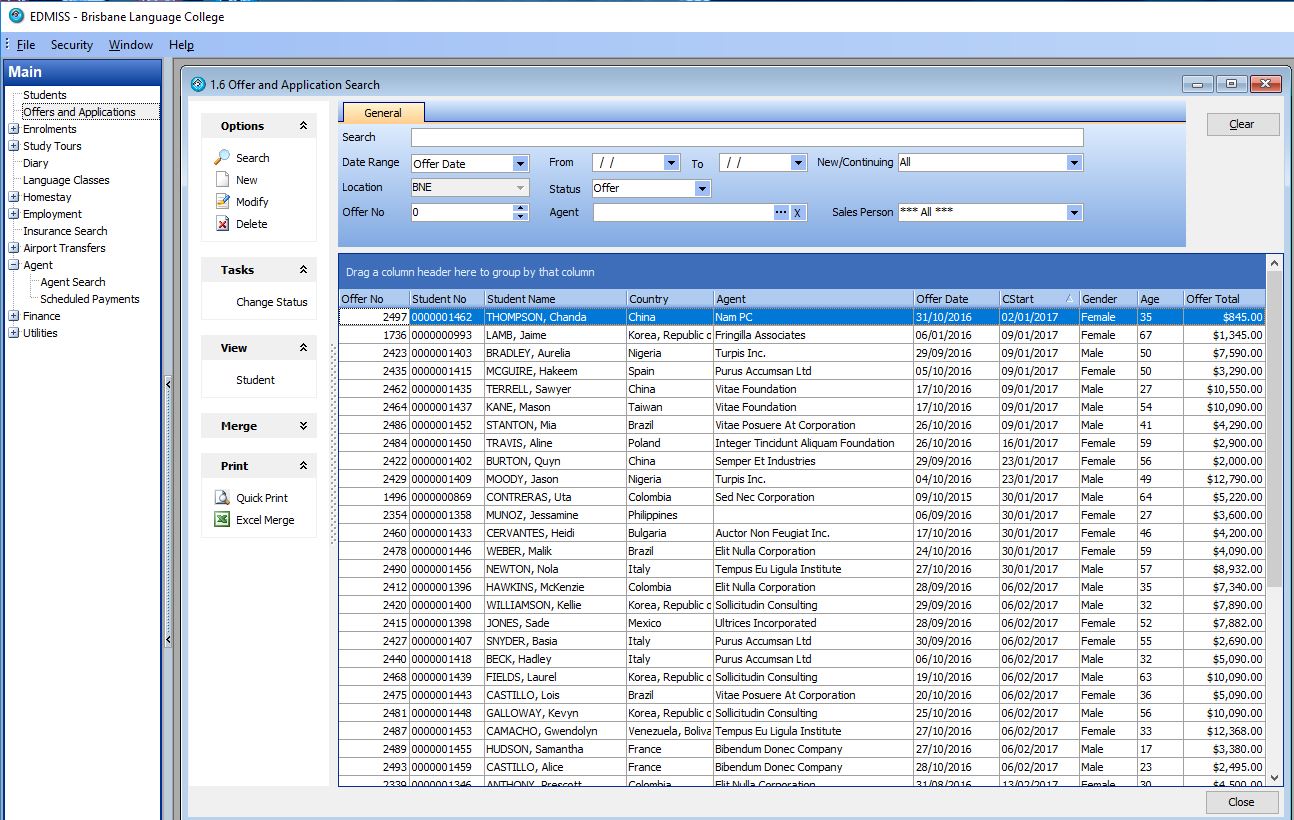
You can use the offers search to group results by agent, country or sales staff and New or Continuing (student has a previous enrolment or offer). Using the grid field chooser please see here, you can also select what fields to display and export these fields into Ms Excel. You can merge, print, sms and email individually or multi-select several student offers. Edmiss also provides you with many report options, including management reports and reports that allow you to see conversion rate by Agent, Country, Course and Sales staff.
An enrolment must be generated from an offer. Line items from the offer, create entries for the student for the course, accommodation request, fee items, airport transfer and insurance.
An offer that has not been accepted does not generate any enrolment details. This means that students with unaccepted offers are not placed on starters lists and are not and cannot be assigned to any classes.
By entering offers, sales staff are able to use the system as a CRM and perform specific searches to follow up prospective students. In addition, as offers do not integrate with financials until they are converted into enrolments, the offer follow up process does not contaminate financials, which may otherwise list the student’s fee details as a debt.
Offers can have the status type: Application (for future use with online applications from agents and directly from students), Offer and Cancelled. When adding a new offer, always check if the student has previously studied at the College or already received an offer, and add a new Offer (you can store multiple program/course options for the same student) for the Student. When you know if the student is not progressing with an enrolment, please Cancel the Offer and update the Cancel reason.
Student offers
An Offer is a package of services, which may include one or more courses. Everything about an offer is flexible.
Once you have added a new student or selected an existing student move to the Student details Offer tab. The left panel has the option New.
A new offer will automatically generate a new offer number and will use the date of creation as the offer date. If the offer is being sent to an agent, please specify the agent and counsellor/contact within the agency.
Specifying the agent for a student offer
If the offer is being sent to an agent rather than a student, the agent must be specified before adding any courses, services or fees. The agent fees are calculated automatically when fees are added, but this requires the agent to be specified first. Please also select the agency staff member who is handling the offer.
If you do not specify an agent, the offer is identified as a direct enrolment. You cannot after entering offer items change the agent (including from a selected direct enrolment i.e. no agent). If you need to change the offer, delete the offer and re-enter the offer. **Warning** you cannot delete or change an accepted offer, which creates an enrolment, as all financials have been entered and locked as a binding contract and for reconciliation and auditing purposes.
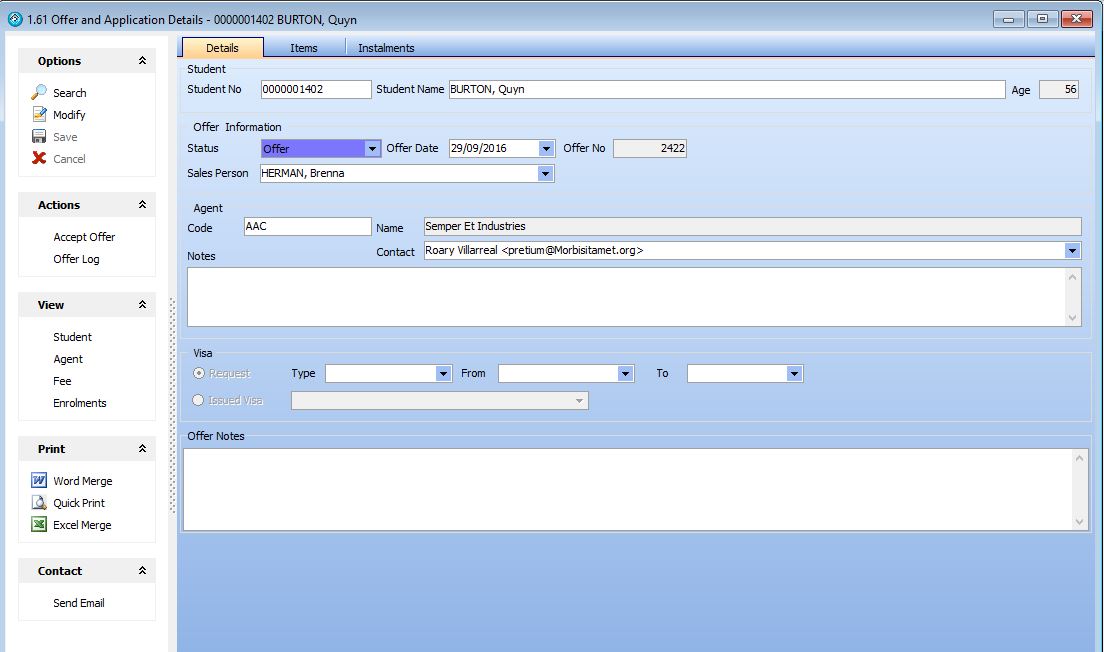
Offer status
Application – Equator IT is currently testing the Edmiss included online application website for Colleges, where agents and students can apply online directly. The College can identify in Edmiss published courses and prices. Applications are listed automatically in the Offer Search screen, and the Edmiss administrator can confirm the application options and prices, and for an agent include discounts and commissions and respond with an offer and update details, and changing the application status. This will also be used as the access point by agent systems where agent applications will appear.
Offer – Current offer
Cancelled – the student or agent has declined or cancelled the offer or the College has withdrawn the offer. When an offer is cancelled, you must specify the reason. You can enter a list of reasons in Setup, typically these may be administrative error, visa refusal, withdrew request, went to another College or any other reason you would like to identify in reports. Cancelled status may also represent instances where the offer has lapsed due to no feedback or acceptance from the student or agent, and the Course has passed (this can be scheduled automatically for offers with passed course start dates in setup.
Assigning Salesperson to follow up offers
You can assign sales staff to follow up an offer. The offer search can then be used to filter and group offers for follow up. Sales staff are often allocated to respond to country based agents and enquiries. Identifying the Salesperson also integrates with many reports which can be grouped by Salesperson, and will integrate with Budgeting.
Offer Visa details
If the student is applying for a Visa, their offer can include details of this visa request, such as the visa type and visa period. If the student has already been issued a visa that is suitable for their new offered course, you can select the existing visa details with the offer.
Adding items to the offer
To add items to the offer, please first select the items tab.
Please always first select Course item option, as the course start date will be used as the grouped due date for all subsequent items.
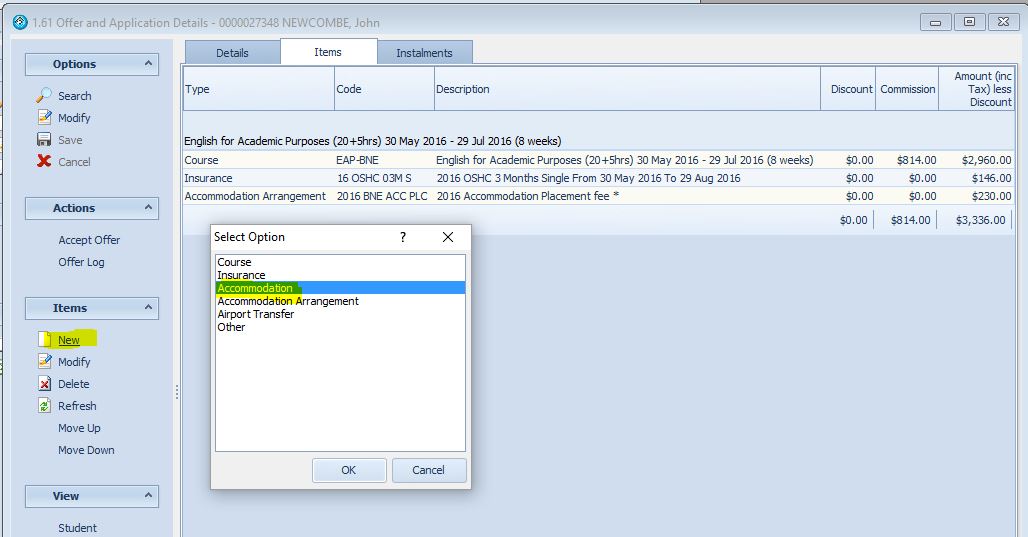
To add items, press the New button under the Items panel on the left. A screen with a list of item types will appear, highlight your selection from the options of Course, Insurance Accommodation, Accommodation Arrangement, Airport Transfer and Other.

Course item entry
After selecting the Course Item entry menu, the below Course item offer screen is displayed. You will need to make your selection from the list of available courses, or enter the code used for the course name.

Pressing the […] button will display the course search screen with your search results. Press search to display the matching list of courses and prices.

Select the course and you will return to the course item details screen. You will need to enter the length of the course in weeks if the course is not fixed length and the start date of the course, which MUST be the Monday of the week the course starts. You will separately specify the days and times of classes, and attendance sessions.
The Monday week start will automatically calculate the course end date, taking into consideration any faculty holidays. The weekly rate is used to multiply by the number of weeks in the course to calculate the tuition amount (gross). You can also use the PriceBook to specify a sliding scale of weekly rates. e.g. The longer the program/course, the lower the weekly rate. 1-10 weeks maybe $320 / week, then 11 to 20 weels maybe $310 per week and 21 -50 weeks maybe $300 per week. Using the Pricebook rate, when the number of weeks are specified, the appropriate rate is used as the multiplier.
If an agent has been specified, the commission rate is used to calculate the agent commission amount for the course. If the agent has multiple commission rates, you can view them and choose the relevant rate by selecting the drop down menu choice. Alternatively, you have the ability to override the calculated rate and specify a custom commission rate if necessary. You can also change the Course Description to be exactly what you want to appear. In setup, you can specify what description is used for course offer items.
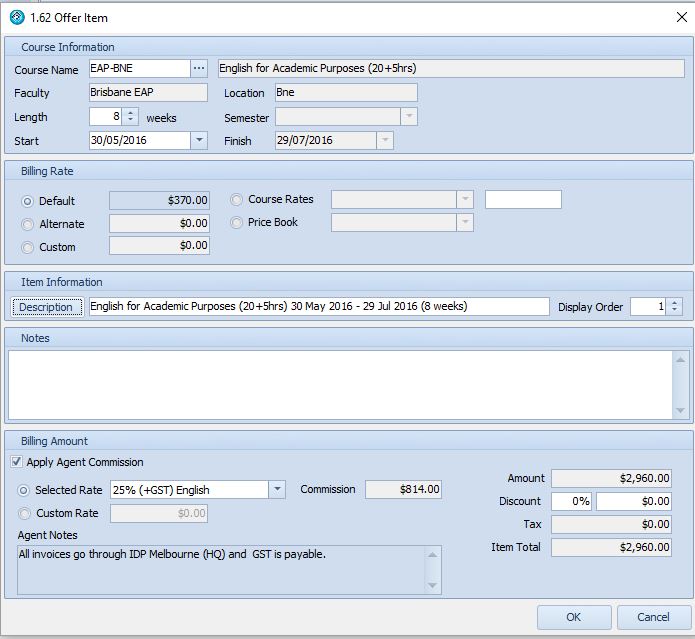
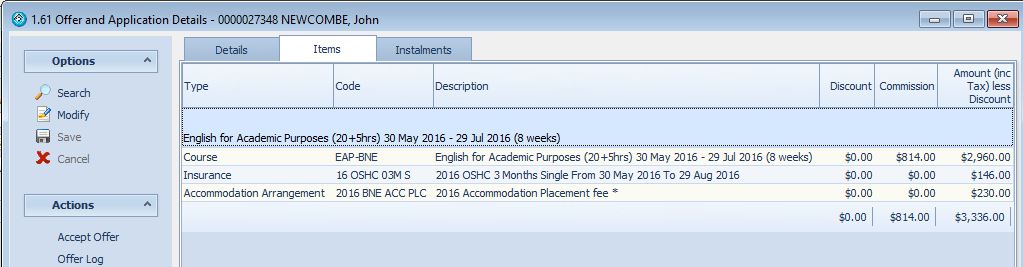
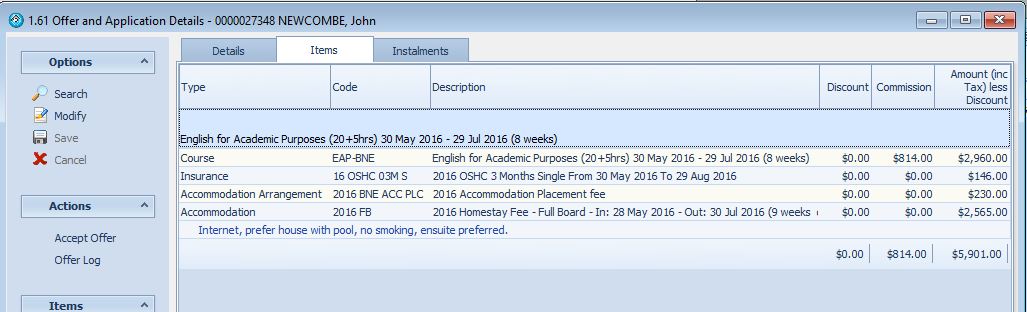
Press the OK button to save all the Course line items for the offer. The offer items will now look like this.

Insurance item entry
To add an Insurance offer item, press the New button under the Items and select Insurance

This will display the Insurance item offer screen. Display and select the correct insurance fee item by pressing the […] button.
Make your insurance selection, including the insurance type single/family etc. and for the period.
The period and type of insurance is specified in the product selection. Select the correct insurance line item. The start date already populated for the insurance is the start date of the course. If the student arrives in the country before this start date, you can adjust it and end date and period will be adjusted accordingly.

Press OK and the offer items are now updated.

Accommodation Arrangement / Placement fee item entry
To add an Accommodation Arrangement offer item, press the New button under the Items and select Accommodation Arrangement.
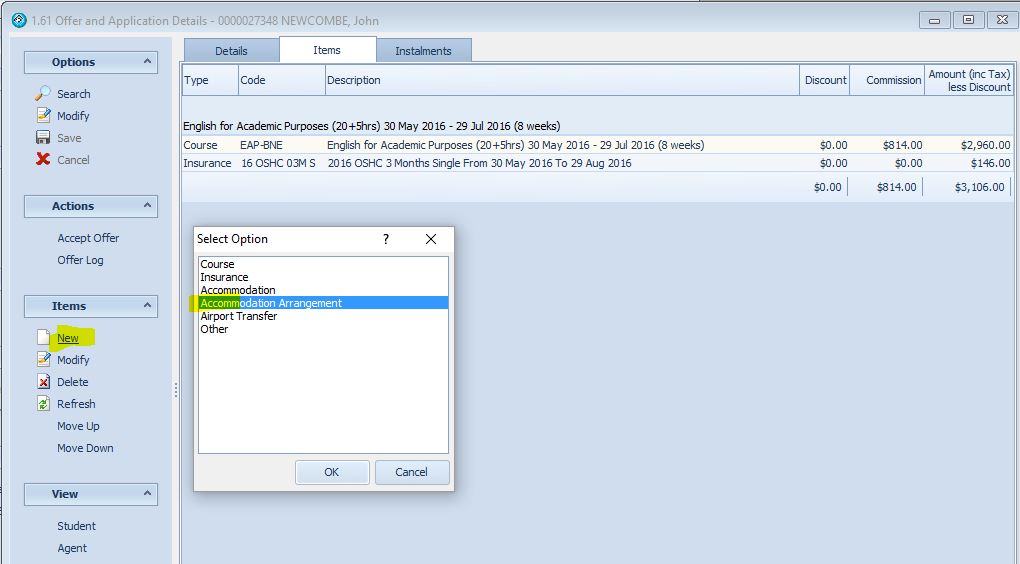
This will display the Accommodation Arrangement item offer screen 1.62, select the Accommodation Arrangement fee item by pressing […]
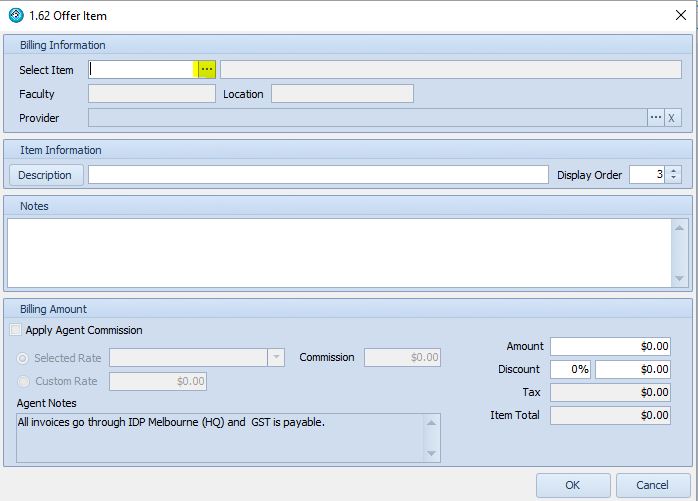
Make your Accommodation Arrangement fee selection.

This will display the Accommodation Arrangement Fee offer details.
If you use an accommodation provider service, the buy and sell price is displayed and fee payments can be scheduled by specifying that accommodation arrangement provider. This allows scheduled payments for accommodation arrangement to be grouped by accommodation provider.

Press OK to add the Accommodation Arrangement line item and the Offer items will be displayed.
Accommodation / Homestay item entry
To add an Accommodation offer item, press the New button under the Items and select Accommodation.
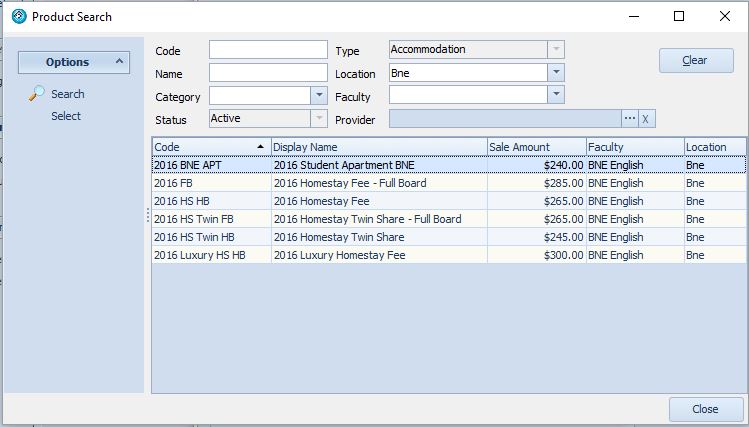
This will display the Accommodation item offer screen 1.62, select the Accommodation fee item by pressing […]

Make your Accommodation fee selection.
Add in the accommodation item details. Usually a homestay provider is not specified in the offer. This is because typically a placement with a homestay provider or family is only made once the student offer has been accepted and an enrolment is created.
An accommodation provider can be assigned as a “provisional placement”, which “pre-allocated” the homestay provider or providing an indication or example of the type of accommodation providers/ homestays available.
Creating a homestay request
You will have to tick the ‘Create Accommodation Request’ and specify the number of weeks and days in the accommodation period. The rate will be displayed as a independent daily rate and a weekly rate.
In the item information, the accommodation request period will be displayed. You can enter any homestay request notes and these will be used to make a suitable homestay/accommodation placement.
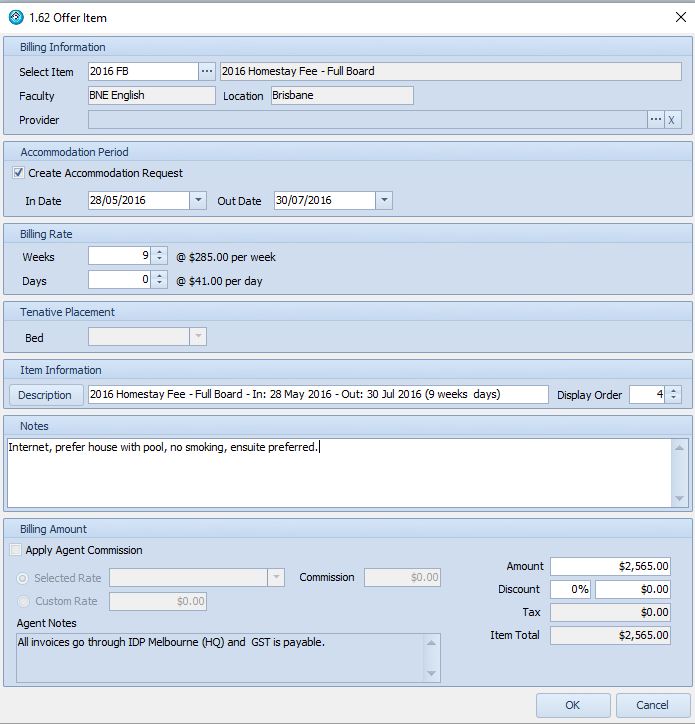
Press OK to add the accommodation item and request as a line item to the offer.
Airport Transfer item entry
To add an Airport Transfer offer item, press the New button under the Items and select Airport Transfer.
![]()
This will display the Airport Transfer item offer screen 1.62, select the Airport Transfer item by pressing […]
![]()
Make your Airport Transfer fee selection.
![]()
You can specify a provider of this service for scheduled payments. You are also able to enter the date, time, flight number, where the student is coming from and/or going to.
![]()
Press OK to add the Airport Transfer line item to the offer.
![]()
Other fee item entry
To add an Other offer item, press the New button under the Items and select Other.

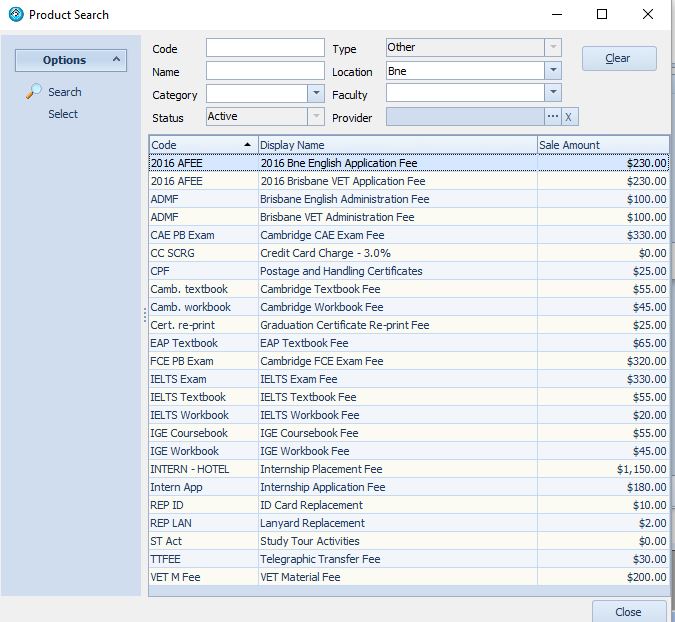
This will display the Other item offer screen 1.62, select the Other fee item by pressing […]

Make your Other fee selection.
The Other offer item details are displayed. After any necessary changes have been made, press OK to update and save.

The Offer has been updated and will now look like this:

Scheduling an installment payment plan
To demonstrate, the Offer items are listed

To view and modify all Installments, please move to the installments tab.

By entering the course as the first item, you will see that the start date of the course is automatically used as the due date for all payments.
To modify the due dates of fees, and enter a payment plan highlight the course item entry and press the Modify option under the Installments options. The following screen is displayed:

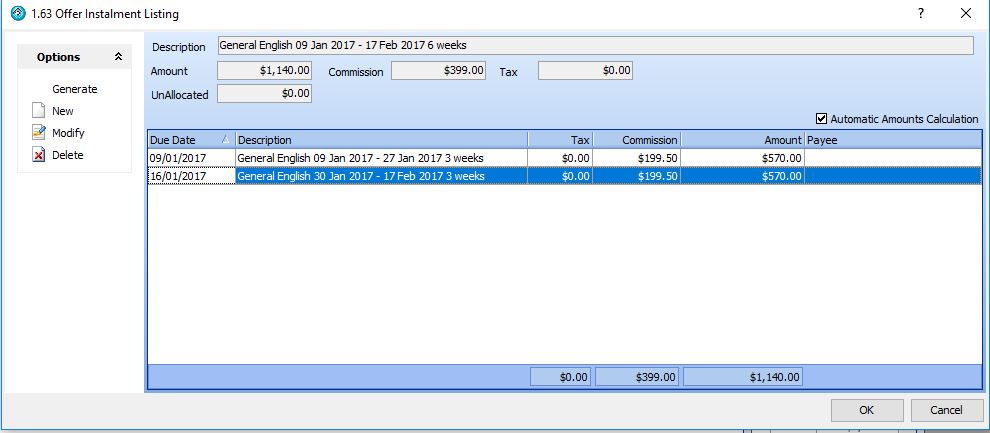
Click on the Generate option on the left hand panel. The following screen will be displayed.

For example select 2 instalments, with the first due on the start date and each subsequent instalment due 2 weeks prior to the next start period.
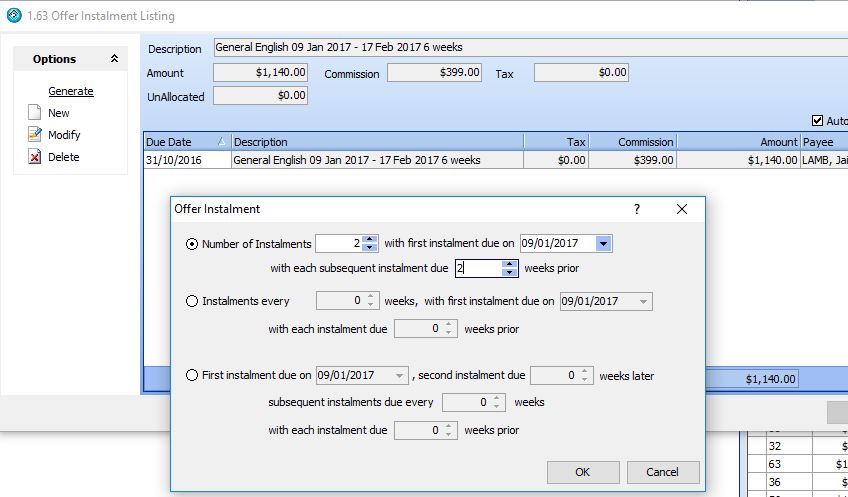
If this option is selected, the Scheduled Instalments will be displayed as follows:
You can also specify who is paying each invoice.
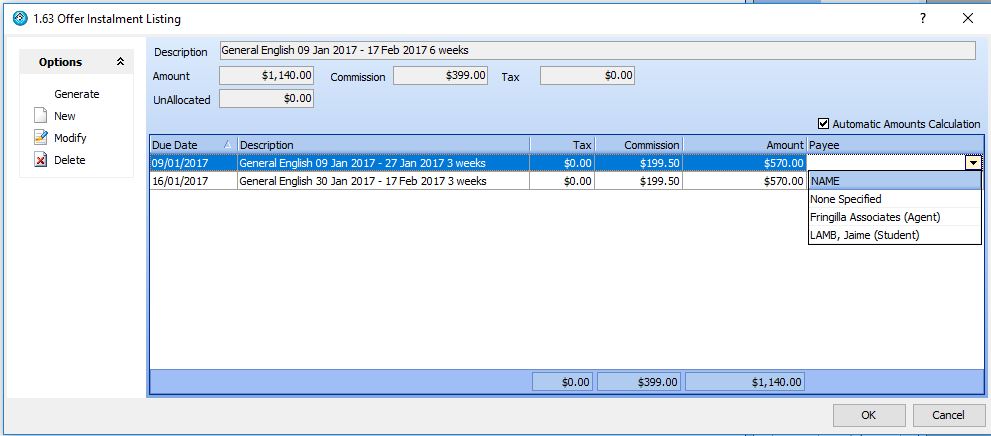
After specifying each invoice payee, the screen will look like this

You can see the due date, as well as a description that includes the course name, the number of weeks (taking into consideration any faculty holidays) and the period corresponding to those weeks. The number of weeks refers to the weeks that the student attends class.
Press OK to display the Offer instalments.

The offer can include multiple courses and those multiple courses can also have instalments scheduled.
Offer print
You are now ready to print and/or generate the offer email to sent to the student and/or agent.
In Edmiss, we can use Microsoft Word templates to merge details into a document that has branding that is tailored and styled by your College. Alternatively you can use a Mandrill template and send details in the email without an attachment.
The follow section will introduce you to using Microsoft Word templates in Edmiss.
Many templates can be preformatted for use and registered in Edmiss. Please refer to the online manual – setup section for creating and registering Templates, see here.
To use a template, select the Word Merge option in the left panel under print. The following screen will be displayed:
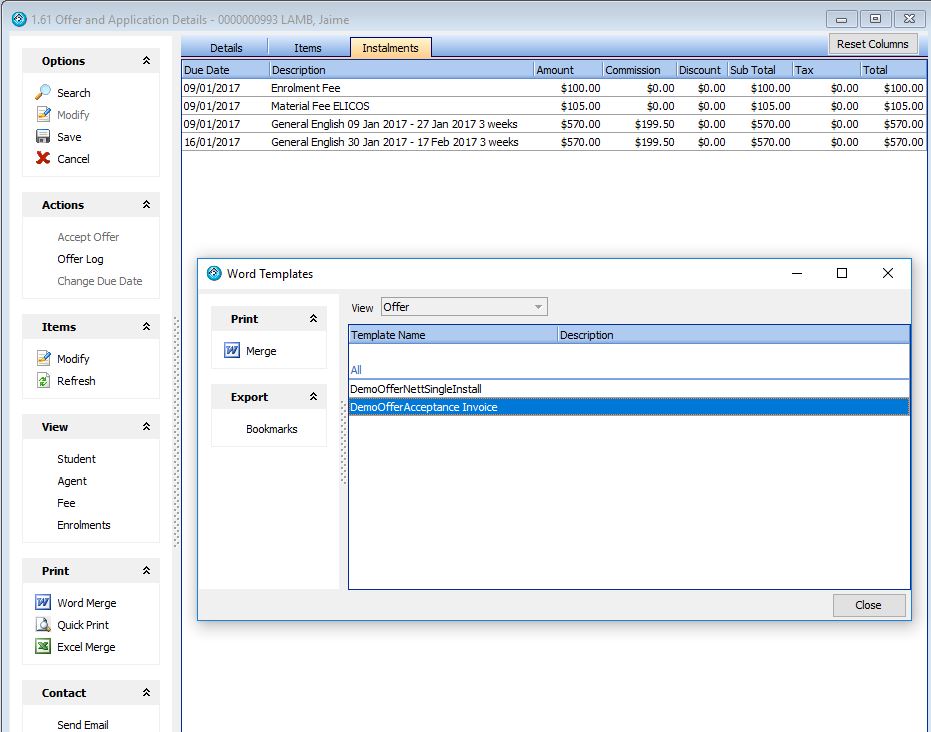
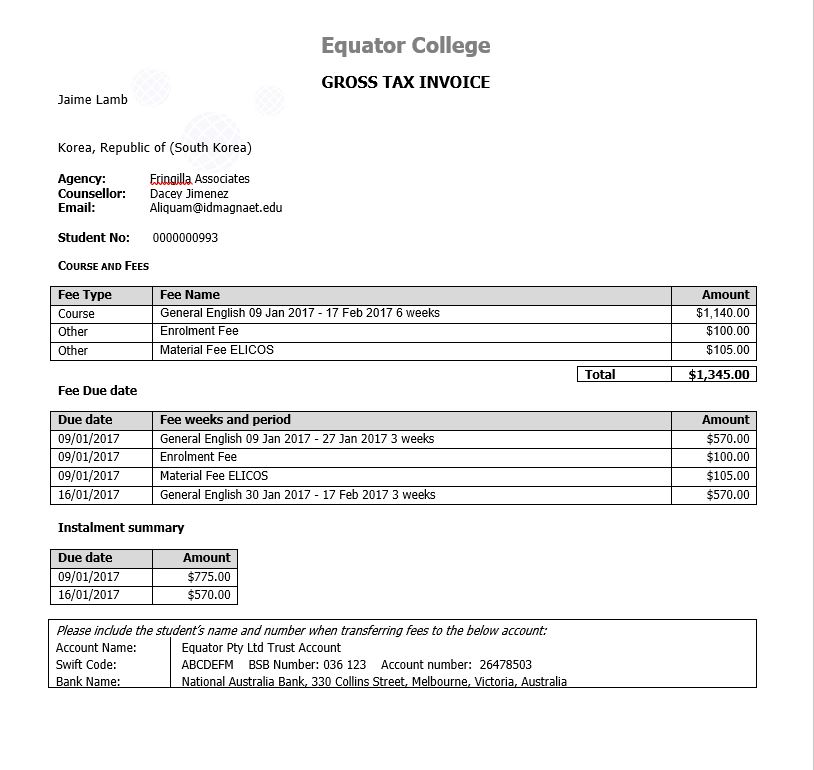
Select the template you want to use and press the Merge button. The data will be extracted out of the database and loaded into the template in Microsoft Word.
Here we have created a template that contains 4 pages:
Page 1:

Page 2:
Page 3:

Templates can have your College letterhead and images embedded in the document.
Store the offer in the Document Repository / Contacts Section
The best way to email the agent or student with the offer attached is to save the document as a PDF. You can Print to those output options within Ms Word, which will create the PDF file.
Email Offer from within eBECAS
To send an email offer from within eBECAS, on the Offer detail screen, press Send email under the option panel Print.
The Student Diary Edit screen appears with the available email addresses already filled in. Select the email addresses you want to send the Offer to. Attach the PDF by pressing the […] button and specifying the PDF file.
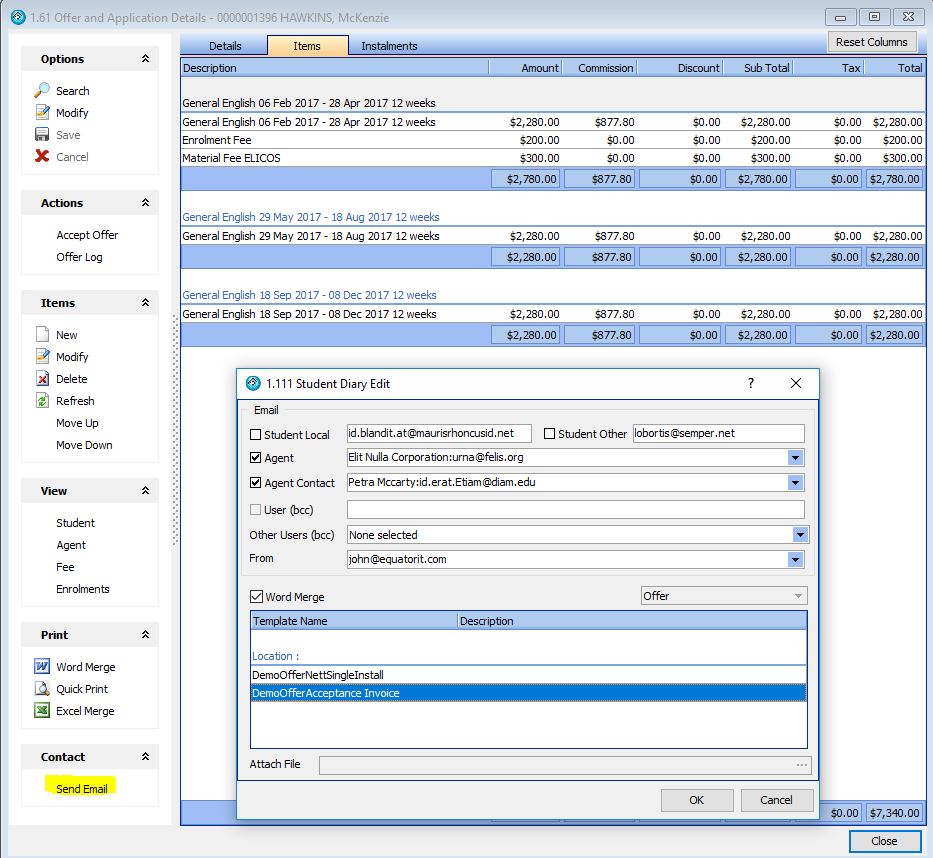
Fill in the Diary details including category, subject and notes. You can mark the Diary entry for attention and/or post a copy to the student portal.
Press OK and the email is sent. Any emails sent from within eBECAS is automatically listed and logged in the Student Diary.
Creating an Enrolment by accepting the Offer
Accepting an offer creates an enrolment. Offers should only be accepted once the deposit has been received and you can confirm that the student will arrive. This usually happens when you generate the eCoE so that the student can obtain a student visa.
While it is up to your college when you accept an offer, Equator IT does not recommend you accept an offer until the agent confirms, the student arrives or pays. An offer is a pro-forma invoice, which may be subject to change. An invoice is not generated until the offer is actually accepted and an enrolment is generated.
The offer process is designed to be flexible and account for changes. A student may have several alternative offers and accept none or one.
Once an offer is accepted, it cannot be changed. The invoice has been generated and will be posted to financials. Changes to the invoices are less flexible as these changes require an audit trail.
Accepting an Offer Go to the Offer items screen 1.61
To accept an offer, first highlight the relevant offer. Then, on the left panel under Actions press the button Accept Offer.
A window will appear to confirm that you do want to accept the student offer and that enrolment/s and invoice/s will be generated. Click the yes button to confirm.
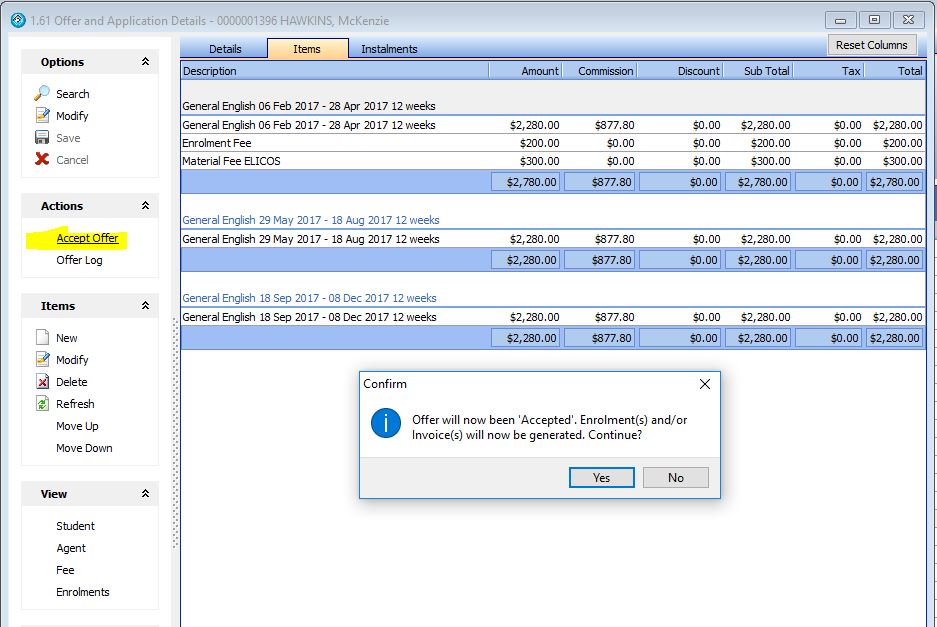
You will see by displaying Offer details that the offer status is updated to Accepted and you cannot modify the offer.

The enrolment will be generated and the details can be found under the Enrolment search window. An invoice has also been generated. Fees can now be receipted and banking can be reconciled against the invoice. The Offer status now shows Accepted.