Subject Result Import
A new data import has been added go to Main – Utilities – VET data load.
The Result Import allows you to import results for your students and update those in Edmiss.
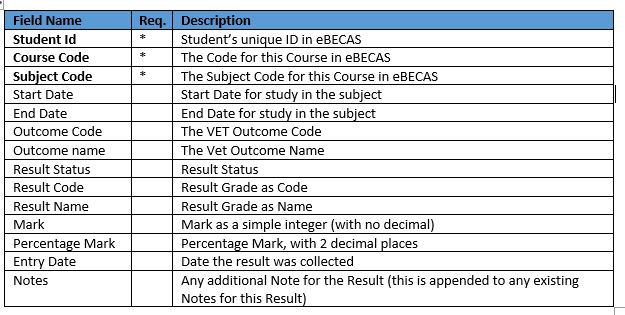
You should first prepare an Excel spreadsheet with the data to be imported. Fields that can be included are shown below.
The Student ID, Course Code and Subject Code are required and are used to match the import data to a Result record in Edmiss. Edmiss will look for and update the latest result for a non-cancelled enrolment matching the Student Id, Course and Subject.
All other fields in the import are optional and will be what is updated. If these are not in the import file, or are blank for a record, that field will not be updated.
Setting up the Import
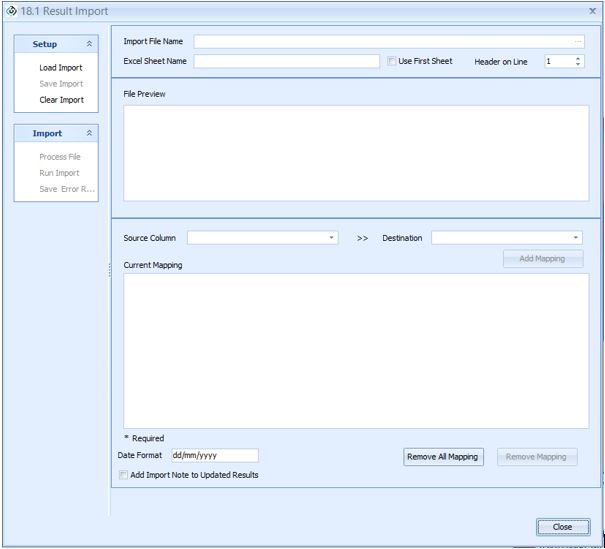
Selecting the VET Data load display the following form:
1. Import File Name: Select the file to be imported. Browse for and select the file to be imported.
2. Excel Sheet Name: Provide the Sheet Name with the data to be imported (or specify Use first Sheet to just use the first sheet of the Excel file).
3. Header on Line: Specify which row the Headers for the import are located (generally this is the first line, though there may be other information above this such as a title). The excel file used for import must have a ‘Header’ line with the name of each column to be imported. 4. Process: Click Process File and eBECAS will read through the file ready to Map the data and Run the import.
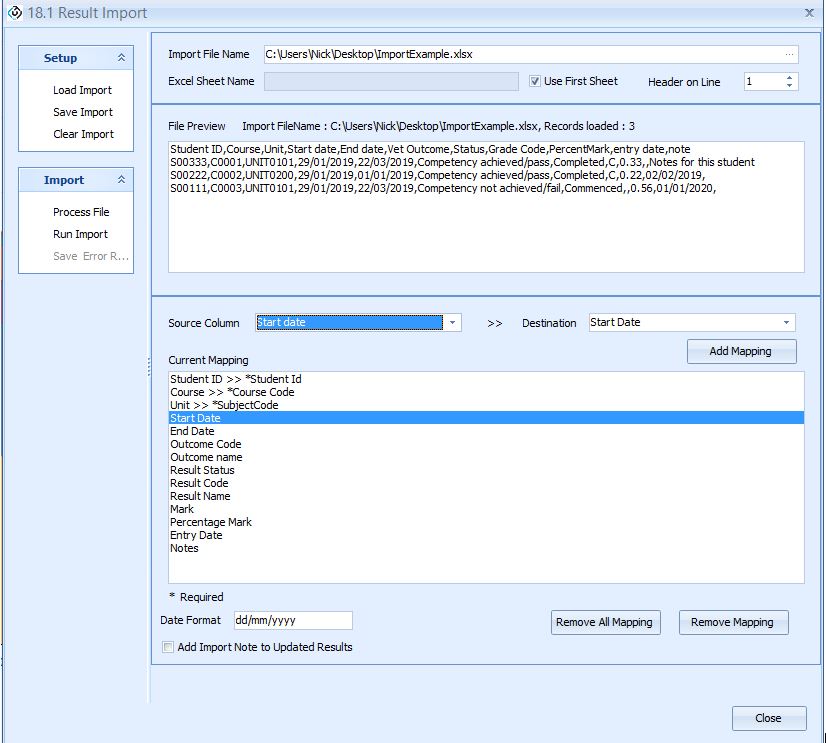
The file will load and a small preview will be shown. The import is now ready for columns to be mapped to Edmiss.
Mapping the Data
Once the File is Processed, setup the Mapping for each field by selecting a Destination Column and selecting the Source Column (from the excel spreadsheet) this will be mapped to (and updated to). Click Add Mapping create this mapping.
Required Destination fields are highlighted with an asterisk. These must be mapped to run the import.
Specify the date format used for any date fields. The default is dd/mm/yyyy
You can also optionally add an Import Note to each updated result. This will append to the Notes for that result the date and file used for the update when it is run.
Once all fields are mapped, the import is ready to run and update Results.
Running the Import
Click Run Import to complete the operation and update Edmiss with the spreadsheet. On completion, a summary of the update, with a count of successful and failed results is shown. A report showing the result for each row can also be saved to be reviewed in Excel.
Loading and Saving Import Settings
Once the Excel file has been selected and processed and the fields mapped, the settings can be saved for later use. Click Save Import to save the import settings.
When the import is next run, click Load Import to load the Import settings. Ensure the excel file is in the same location with the same name (or browse and select the new import file). All Mapping and other setting will then be restored ready to Run the import without need for further configuration.
Status, Outcome and Result Lookups
For updating Result Status, the column mapped to the Result Status must match the below list used by Edmiss.
For Updating VET Outcomes, the Code or Name must match a value below. If the VET Code is mapped, it will always be used and the Outcome Name ignored.
Result Codes (Grades) are setup for each college, and the name and code must match the name or code used in Edmiss. Go to Utilities – Setup Configuration and then go to HE – Result Codes to view the codes and name used for Grades. If the Result Code is specified in the import, the Result Name is ignored.


